はじめに
最近はすっかりWeb系スクリプト言語しか触らなくなってしまいました。
たまには毛色の異なる言語を使いたいと思い、Rustに手を出してみました。
Windows 10でCygwinを使った環境構築と、「Hello, World」までをやります。
参考URL:
rustup.rs - The Rust toolchain installer
プログラミング言語Rust
手順
Rustのインストール
下記に書いてある通りではあるんですが…細かく見ていきます。
rustup.rs
doc.rust-jp.rs
Windowsの場合はexeをダウンロードして実行するのが普通のようですが、
If you're a Windows Subsystem for Linux user run the following in your terminal, then follow the onscreen instructions to install Rust.
WSLユーザーはターミナルで下記を実行して、Rustをインストールしてね(意訳)
とあるので、Cygwinの私はコマンドで実行してみました。
もしコマンドでインストールできなかった場合は、上記URLのページ内にある
You appear to be running Windows 64-bit. If not, display all supported installers.
の後半部分をクリックして、インストーラーをダウンロードするとよいと思います。
$ curl --proto '=https' --tlsv1.2 -sSf https://sh.rustup.rs | sh
info: downloading installer
Rust Visual C++ prerequisites
Rust requires the Microsoft C++ build tools for Visual Studio 2013 or later,
but they don\'t seem to be installed.
The easiest way to acquire the build tools is by installing Microsoft Visual
C++ Build Tools 2019 which provides just the Visual C++ build tools:
https://visualstudio.microsoft.com/downloads/
Please ensure the Windows 10 SDK component is included when installing the
Visual C++ Build Tools.
Alternately, you can install Visual Studio 2019, Visual Studio 2017, Visual
Studio 2015, or Visual Studio 2013 and during install select the "C++ tools":
https://visualstudio.microsoft.com/downloads/
Install the C++ build tools before proceeding.
If you will be targeting the GNU ABI or otherwise know what you are doing then
it is fine to continue installation without the build tools, but otherwise,
install the C++ build tools before proceeding.
Continue? (Y/n)
Rust requires the Microsoft C++ build tools for Visual Studio 2013 or later,
but they don't seem to be installed.
Microsoft C++ build tools for Visual Studio 2013 かそれ以降が入っていないぞと言われました。
これが必要になるんですね。
Build Tools for Visual Studio 2019 のインストール
visualstudio.microsoft.com
上にもURLがありましたが、こちらからインストールが可能です。
「Visual Studio 2019 のツール」→「Build Tools for Visual Studio 2019」
と探してみてください。
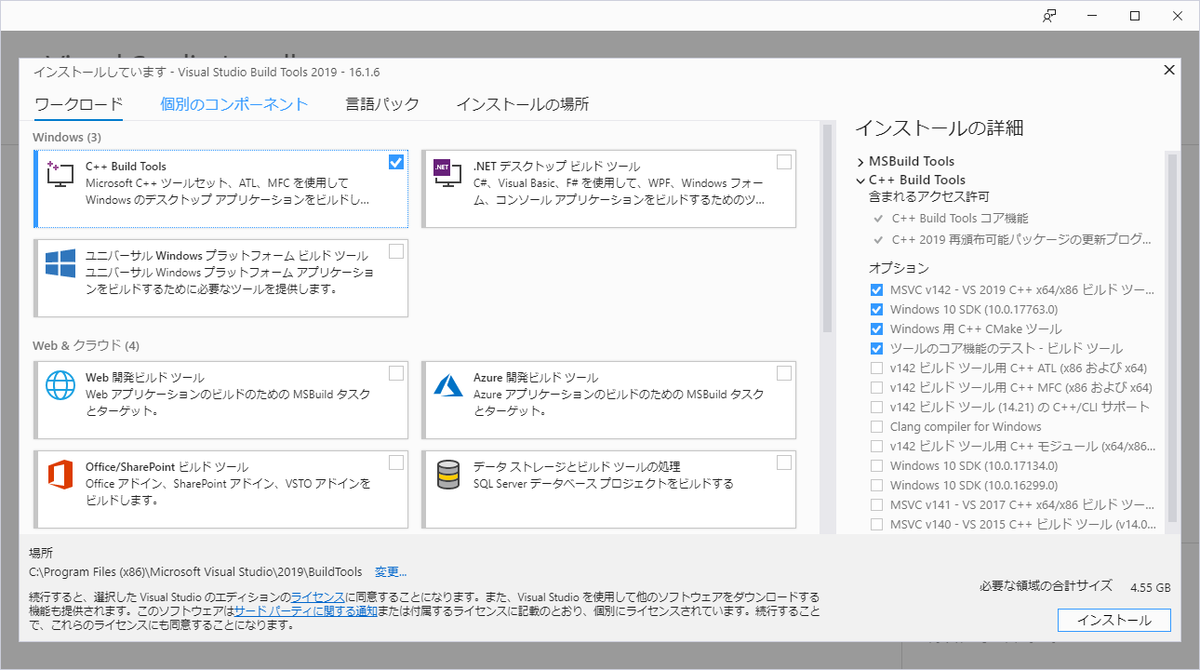
インストールを進めていくと、下記画面になります。
今回は左上の「C++ Build Tools」を選択すればOKです。

Rustのインストール (続き)
先程の画面から、「Y」を入力して進めると、↓のような感じになります。
Welcome to Rust!

This will download and install the official compiler for the Rust programming
language, and its package manager, Cargo.

It will add the cargo, rustc, rustup and other commands to Cargo\'s bin
directory, located at:

  C:\Users\${USER}\.cargo\bin

This path will then be added to your PATH environment variable by modifying the
HKEY_CURRENT_USER/Environment/PATH registry key.

You can uninstall at any time with rustup self uninstall and these changes will
be reverted.

Current installation options:

   default host triple: x86_64-pc-windows-msvc
     default toolchain: stable
  modify PATH variable: yes

1) Proceed with installation (default)
2) Customize installation
3) Cancel installation
>1
デフォルト設定でよいので、1で進めます。
info: syncing channel updates for 'stable-x86_64-pc-windows-msvc'
info: latest update on 2019-07-04, rust version 1.36.0 (a53f9df32 2019-07-03)
info: downloading component 'rustc'
info: downloading component 'rust-std'
info: downloading component 'cargo'
info: downloading component 'rust-docs'
info: installing component 'rustc'
info: installing component 'rust-std'
info: installing component 'cargo'
info: installing component 'rust-docs'
info: default toolchain set to 'stable'

  stable installed - rustc 1.36.0 (a53f9df32 2019-07-03)


Rust is installed now. Great!

To get started you need Cargo's bin directory (%USERPROFILE%\.cargo\bin) in
your PATH environment variable. Future applications will automatically have the
correct environment, but you may need to restart your current shell.

Press the Enter key to continue.
これでいったん完了です。
exeファイルはこちらに格納されています。
$ ls -l /cygdrive/c/Users/${USER}/.cargo/bin/
合計 94512
-rwx------+ 12 ${USER} ${GROUPS} 8062381 7月  26 22:40 cargo.exe
-rwx------+ 12 ${USER} ${GROUPS} 8062381 7月  26 22:40 cargo-clippy.exe
-rwx------+ 12 ${USER} ${GROUPS} 8062381 7月  26 22:40 cargo-fmt.exe
-rwx------+ 12 ${USER} ${GROUPS} 8062381 7月  26 22:40 cargo-miri.exe
-rwx------+ 12 ${USER} ${GROUPS} 8062381 7月  26 22:40 clippy-driver.exe
-rwx------+ 12 ${USER} ${GROUPS} 8062381 7月  26 22:40 rls.exe
-rwx------+ 12 ${USER} ${GROUPS} 8062381 7月  26 22:40 rustc.exe
-rwx------+ 12 ${USER} ${GROUPS} 8062381 7月  26 22:40 rustdoc.exe
-rwx------+ 12 ${USER} ${GROUPS} 8062381 7月  26 22:40 rustfmt.exe
-rwx------+ 12 ${USER} ${GROUPS} 8062381 7月  26 22:40 rust-gdb.exe
-rwx------+ 12 ${USER} ${GROUPS} 8062381 7月  26 22:40 rust-lldb.exe
-rwx------+ 12 ${USER} ${GROUPS} 8062381 7月  26 22:40 rustup.exe
このままだとパスが通っていないので、シムリンクを/usr/local/binに作成して、コマンドを実行できるようにします。
$ ./cargo --version
cargo 1.36.0 (c4fcfb725 2019-05-15)
$ cd /usr/local/bin
$ ln -s /cygdrive/c/Users/${USER}/.cargo/bin/cargo.exe cargo
$ ln -s /cygdrive/c/Users/${USER}/.cargo/bin/rustc.exe rustc
$ ln -s /cygdrive/c/Users/${USER}/.cargo/bin/rustup.exe rustup
$
$ cargo --version
cargo 1.36.0 (c4fcfb725 2019-05-15)
$
$ rustc --version
rustc 1.36.0 (a53f9df32 2019-07-03)
$
$ rustup --version
rustup 1.18.3 (435397f48 2019-05-22)
これでインストール作業はおしまいです。
Hello, World!
doc.rust-jp.rs
こちらを見て進めていきます。
プロジェクト用のディレクトリを作成し、
$ mkdir ~/projects
$ cd ~/projects
$ mkdir hello_world
$ cd hello_world
ファイルを作成します。
vim main.rs
ファイルの中身はこれだけです。
fn main() {
    println!("Hello, world!");
}
コンパイルして…
ちなみにコンパイルするとアレコレファイルが出来上がります。
$ rustc main.rs
$ ls -l
total 1357
-rwxr-xr-x 1 ${USER} ${GROUPS}  139264 Jul 26 19:17 main.exe
-rwxr-xr-x 1 ${USER} ${GROUPS} 1249280 Jul 26 19:17 main.pdb
-rw-r--r-- 1 ${USER} ${GROUPS}      46 Jul 26 18:46 main.rs
最後に生成された実行ファイルを実行すると…できました。
$ ./main
Hello, world!
Hello, World! その2
Cargoという、一緒にインストールしたパッケージManagerを使います。
Hello, world! くらいでは恩恵は感じませんが、基本はこのCargo経由でコンパイルするのが普通のようです。
まずはディレクトリ構成を変更、実行ファイルも一旦削除します。
$ mkdir src
$ mv main.rs src/main.rs
$ rm main
コンパイルするには、下記コマンドを実行します。
lsも実行してみましたが、勝手にファイルやディレクトリが生成されています、
$ cargo build
   Compiling hello_world v0.0.1 (C:\cygwin64\home\${USER}\work\rust\hello_world)
    Finished dev [unoptimized + debuginfo] target(s) in 0.50s
$ ls -l
total 1222
-rwxr-xr-x  1 ${USER} ${GROUPS}     143 Jul 26 18:35 Cargo.lock
-rw-r--r--  1 ${USER} ${GROUPS}     104 Jul 26 18:35 Cargo.toml
-rwxr-xr-x  1 ${USER} ${GROUPS} 1249280 Jul 26 18:17 main.pdb
drwxr-xr-x+ 1 ${USER} ${GROUPS}       0 Jul 26 18:34 src
drwxr-xr-x+ 1 ${USER} ${GROUPS}       0 Jul 26 18:35 target
buildコマンドに引数を付けない場合、debugモードでコンパイルされているようです。
実行するには下記のコマンドを叩きます。
$ ./target/debug/hello_world
Hello, world!
いちいち階層を辿らなくとも、cargoコマンドを使っても実行できます、
$ cargo run
    Finished dev [unoptimized + debuginfo] target(s) in 0.01s
     Running `target\debug\hello_world.exe`
Hello, world!
debugではなく、releaseモードでコンパイルする場合はこちら。
$ cargo build --release
   Compiling hello_world v0.0.1 (C:\cygwin64\home\${USER}\work\rust\hello_world)
    Finished release [optimized] target(s) in 0.25s
$ ./target/release/hello_world
Hello, world!
lsするとわかりますが、各ディレクトリに実行ファイルができていますね。
しかも容量が微妙に違います。debugモードの機能が仕組まれているんでしょうね。
(詳細は調べてません…)
$ ls -l ./target/{debug,release}/hello_world
-rwxr-xr-x 2 ${USER} ${GROUPS} 139776 Jul 26 18:35 ./target/debug/hello_world
-rwxr-xr-x 2 ${USER} ${GROUPS} 137216 Jul 26 18:38 ./target/release/hello_world
最後に
私は元々C言語系をやっていて、それからWebの世界に入りました。
そのせいかRustは懐かしさを覚えつつも、最近の言語である便利さも兼ね備えれていると感じました。
ぜひスクリプト言語がメインの方も、気分転換に他の言語を触ってみてはいかがでしょうか。
以上でした!

