HRR Co., Ltd.

技術的な記録を残していくことを目的としています。1次情報を大事にしています。

Chatwork APIを使ってみる (1)

はじめに

SlackやらChatworkやら、業務でチャットツールを使っているところは多いと思います。
今回はChatwork APIを使った例を共有します。

ちなみに、curlPHPで実行してみます。

公式ドキュメント

developer.chatwork.com

こちらにあります。
注意事項もあるので、上記ページは読んでおくことをオススメします。

API実行にはTokenが必要になりますが、組織管理者への申請が必要な場合があります。
権限的に使えるようであれば、

Chatwork画面右上の「利用者名」をクリックして表示されるメニューの「API設定」から

APIのTokenを取得できます。

例1: マイチャットにメッセージを投稿してみる (curl編)

固定のメッセージをPOSTするだけなら、プログラムを組まずとも、curlコマンドでできます。

curl -X POST -H "X-ChatWorkToken:TOKEN_CODE" -d "body=test message&self_unread=1" "https://api.chatwork.com/v2/rooms/ROOM_ID/messages"

TOKEN_CODEROOM_IDを、ご自分の環境に合わせてから実行してみてください。
ROOM_IDは、グループチャットを選択したときの、URLを見るとわかります。

https://www.chatwork.com/#!rid********

********のところがROOM_IDです。

実行すると、コマンドの返り値として

{"message_id":"MESSAGE_ID"}

が返却されます。MESSAGE_IDにはその名の通り、メッセージごとの固有のIDが入ります。
そして、指定のグループチャットに「test message」と未読の投稿がされると思います。

例2: マイチャットにメッセージを投稿してみる (PHP編)

次はPHPで書いてみます。結局PHPでもcurlを使うんですが…。

<?php

$ch = curl_init();
$postRoomId = "ROOM_ID";
$message = "test message";

curl_setopt($ch, CURLOPT_URL, "https://api.chatwork.com/v2/rooms/".$postRoomId."/messages");
curl_setopt($ch, CURLOPT_HTTPHEADER, array("X-ChatWorkToken: TOKEN_CODE"));
curl_setopt($ch, CURLOPT_POST, true);
curl_setopt($ch, CURLOPT_POSTFIELDS, array('body' => $message, 'self_unread' => 1));
curl_setopt($ch, CURLOPT_RETURNTRANSFER, true);
$messageId = curl_exec($ch);
curl_close($ch);

echo $messageId;

こちらも、コマンドの返り値として

{"message_id":"MESSAGE_ID"}

が返却されます。そして、指定のグループチャットに「test message」という未読の投稿がされると思います。

最後に

第2弾を用意する予定ですので、第1弾はここまで。
今回のメッセージ投稿が、API活用の基本になるのではないかと思います。

次回はもう少し実践的な例を投稿予定です。
以上でした!

Hugoで記事にタグをつける

はじめに

Quick Startをみると、記事の縦方向の分類であるSection(セクション)については書かれていますが、横方向の分類であるタグについては書かれていませんでした。

gohugo.io

そこでタグの付け方を調べてみました。
Hugoのバージョンは下記のとおりです。

$ hugo version
Hugo Static Site Generator v0.59.0-1DD0C69C windows/amd64 BuildDate: 2019-10-21T09:40:37Z

前提条件

hrroct.hatenablog.com

こちらにある通り、Quick Startを済ませた状態を前提とて、説明します。
記事を書き始めている人でも、全然問題ないと思いますが。

やり方

Hugoのドキュメントを探したのですが、記述方法については見つからず…
一次情報ではありませんが、記事ファイルを開いて、追加するだけでOKです。

$ vim content/posts/my-first-post.md
---
title: "My First Post"
date: 2019-09-11T11:13:32+09:00
draft: true
tags: ["test", "test2"] 
---
てすと

tags: ["test", "test2"]のように、配列で定義してあげるだけです。
一つの場合も配列で、ない場合は空配列でOKのようです。
tags: []こんな感じで。

また、下記のような書き方でもOKです。

tags: 
  - "test"
  - "test2"

確認してみる

その後、ビルトインサーバーを立ち上げて、確認してみます。

hugo server -D

その後、http://localhost:1313/posts/my-first-post/ を見てみると…

タグを付与した記事ページ

タグが表示されているのがわかります。
(表示はテーマによって変わると思います。)
クリックすると、そのタグがついか記事の一覧も表示されます。

最後に

テーマによって見た目も表示方法も変わってくると思います。
適切に表示してくれるものを選ぶか、カスタマイズする必要が出てくるかもしれません。

以上、タグの付与のやり方でした。

HugoをCygwinで使ってみる

はじめに

最終的なゴールは静的コンテンツのブログサイト構築です。
その第一歩として、Hugoのインストールを行います。
Windows 10 + Cygwin です。

自前でサーバーを準備して、ブログシステムを入れたいと思っています。
真っ先に思いついたのがWordPressでした。
しかしWordPressはしょっちゅう脆弱性に対する更新プログラムが配られているようなイメージがあります(偏見でしたらすみません…)。
ちょっとメンテナンスが大変になるなと。

そこで、早さや脆弱性対策を鑑みて、静的コンテンツでリリースできる形を目指しました。
そこで選んだのがHugoです。

Hugoとは

gohugo.io

Hugo is a fast and modern static site generator written in Go, and designed to make website creation fun again.

HugoはGo言語で書かれた早くてモダンな静的サイトジェネレータですよ。またWebサイトの創作を再び面白くするためにデザインされてますよ。(意訳)

と書かれている通り、静的サイトを生成するツールです。
インプットはMarkdownファイルで、アウトプットがディレクトリ付きのサイトになります。

Hugoのインストール

gohugo.io

何となくMac推しであるような気が…。
Cygwinで使う場合は、Windowsのexeファイルを手に入れるのが早いと思います。

github.com

私の場合は hugo_0.58.1_Windows-64bit.zip でした。
これの中身、hugo.exe/usr/local/bin/ にコピーすればOKです。試しに下記コマンドを実行してみるといいと思います。

$ hugo version
Hugo Static Site Generator v0.58.1-24277B92 windows/amd64 BuildDate: 2019-09-06T09:19:22Z

Hugoを使ってみる

gohugo.io

Quick Start があるので、これに従います。

Step 1: Install Hugo

これは終わったのでスキップします。

Step 2: Create a New Site

新しいサイトを作成します。
作業ディレクトリを作成しておきます。

$ mkdir -p ~/work/hugo/
$ cd ~/work/hugo/

記載されたコマンドを実行します。

$ hugo new site quickstart
Congratulations! Your new Hugo site is created in C:\cygwin64\home\${USER}\work\hugo\quickstart.

Just a few more steps and you're ready to go:

1. Download a theme into the same-named folder.
   Choose a theme from https://themes.gohugo.io/ or
   create your own with the "hugo new theme <THEMENAME>" command.
2. Perhaps you want to add some content. You can add single files
   with "hugo new <SECTIONNAME>\<FILENAME>.<FORMAT>".
3. Start the built-in live server via "hugo server".

Visit https://gohugo.io/ for quickstart guide and full documentation.

このあとの手順も出力されてますね。
簡単に訳すと、

  1. テーマを同じ名前をつけたフォルダにダウンロードしてね。
  2. 多分あなたはコンテンツを追加したいよね。hugo new <SECTIONNAME>\<FILENAME>.<FORMAT> でシングルファイルを追加できるよ。
  3. hugo server でビルトインの本番サーバーを立ち上げよう。

こんな感じでしょうか。

Step 3: Add a Theme

というわけで、テーマを追加します。
今回は書いてあるとおりに、anankeというテーマを入れてみます。
Git使います。

cd quickstart
 
# テーマのダウンロードと設置
git init
git submodule add https://github.com/budparr/gohugo-theme-ananke.git themes/ananke
 
# テーマを設定ファイルに追加
echo 'theme = "ananke"' >> config.toml 

こんな感じで、設定ファイルに書き込まれます。手動で書いてもいいですね。

$ cat config.toml
baseURL = "http://example.org/"
languageCode = "en-us"
title = "My New Hugo Site"
theme = "ananke"

Step 4: Add Some Content

ブログなので、コンテンツを追加します。
上にも書いたとおり、形式はhugo new <SECTIONNAME>\<FILENAME>.<FORMAT>です。
具体的には、

hugo new posts/my-first-post.md

こんな感じです。
これならコマンドを叩く必要を感じないかもしれませんが、タイトルや投稿日をファイルの中に書く必要があります(下の画像を参照のこと)。
それをファイルに書き込んでくれるので、生成はコマンドが便利かと思います。

$ cat content/posts/my-first-post.md
---
title: "My First Post"
date: 2019-10-31T06:13:32+09:00
draft: true
---

記事本文もわかるように、下のように軽く追記しておきます。

---
title: "My First Post"
date: 2019-10-31T06:13:32+09:00
draft: true
---
てすと

Step 5: Start the Hugo server

あとはビルトインサーバーが、コマンド一発で立ち上がります。

hugo server -D

-D--buildDraftsでもよく、ドラフトの記事(作成途中、未公開)も含めて表示しちゃうオプションのようです。

URLはデフォルトで http://localhost:1313/ のようですので、表示してみましょう。
きっと画像のようになるはず。

f:id:hrroct:20191029153120p:plain

Step 6: Customize the Theme

テーマのカスタマイズも必要かもしれませんが、何よりサイト名や言語設定を変更しておく必要があります。

$ cat config.toml
baseURL = "http://example.org/"
languageCode = "en-us"
title = "My New Hugo Site"
theme = "ananke"

それぞれの項目を、自分に合わせた内容に修正します。

Step 7: Build static pages

最後です。
最終目標である、静的コンテンツを生成します。コマンドは簡単で、

hugo

と打つだけです。
./public/フォルダに出力されますが、コンテンツがdraft: falseの場合、この出力に含まれませんので、ご注意ください。
(というか出力されたら困るものですが…)

おわりに

というわけで、記事はMarkdownなどテキスト形式で書くことができ、hugoコマンド一発で静的コンテンツの生成ができます。
あとはこれをサーバーに公開するところまで、ワンストップでできるといいのですが…。

それはまた調べてみます。
以上でした!

GASでセルの書式を指定して値を入れる

はじめに

小ネタです。
GAS (Google Apps Script) を利用して、セルに値を入れる際、書式を指定したいケースがあると思います。

例えば、IDや電話番号など、頭に0がつく数字の場合。そのまま入れると、おそらく0が消えて値が入ることになると思います。
そんなときの書式の指定方法です。

やり方

developers.google.com

setNumberFormatメソッドを使います。
例にあるように、decimalの指定もできますし、

var ss = SpreadsheetApp.getActiveSpreadsheet();
var sheet = ss.getSheets()[0];

var cell = sheet.getRange("B2");
// Always show 3 decimal points
cell.setNumberFormat("0.000");

@を指定することで、書式なしで(raw textで)入れることもできます。

var ss = SpreadsheetApp.getActiveSpreadsheet();
var sheet = ss.getSheets()[0];

var telNumber = "09000000000";
sheet.getRange(1, 2).setNumberFormat('@').setValue(telNumber);

指定できるものは、ドキュメントに書いてあるので、詳細はそちらを見ましょう。

developers.google.com

最後に

GASを使う機会が増えてきました。
Macでも問題なく使うことができたり、GmailGoogle Driveと連携できるのがいいですね。

以上でした。

RustをWindows 10 (Cygwin)で試してみた話

はじめに

最近はすっかりWeb系スクリプト言語しか触らなくなってしまいました。
たまには毛色の異なる言語を使いたいと思い、Rustに手を出してみました。

Windows 10でCygwinを使った環境構築と、「Hello, World」までをやります。

参考URL:
rustup.rs - The Rust toolchain installer プログラミング言語Rust

手順

Rustのインストール

下記に書いてある通りではあるんですが…細かく見ていきます。
rustup.rs

doc.rust-jp.rs

Windowsの場合はexeをダウンロードして実行するのが普通のようですが、

If you're a Windows Subsystem for Linux user run the following in your terminal, then follow the onscreen instructions to install Rust.

WSLユーザーはターミナルで下記を実行して、Rustをインストールしてね(意訳)

とあるので、Cygwinの私はコマンドで実行してみました。
もしコマンドでインストールできなかった場合は、上記URLのページ内にある

You appear to be running Windows 64-bit. If not, display all supported installers.

の後半部分をクリックして、インストーラーをダウンロードするとよいと思います。

$ curl --proto '=https' --tlsv1.2 -sSf https://sh.rustup.rs | sh
info: downloading installer

Rust Visual C++ prerequisites

Rust requires the Microsoft C++ build tools for Visual Studio 2013 or later,
but they don\'t seem to be installed.

The easiest way to acquire the build tools is by installing Microsoft Visual
C++ Build Tools 2019 which provides just the Visual C++ build tools:

  https://visualstudio.microsoft.com/downloads/#build-tools-for-visual-studio-2019

Please ensure the Windows 10 SDK component is included when installing the
Visual C++ Build Tools.

Alternately, you can install Visual Studio 2019, Visual Studio 2017, Visual
Studio 2015, or Visual Studio 2013 and during install select the "C++ tools":

  https://visualstudio.microsoft.com/downloads/

Install the C++ build tools before proceeding.

If you will be targeting the GNU ABI or otherwise know what you are doing then
it is fine to continue installation without the build tools, but otherwise,
install the C++ build tools before proceeding.

Continue? (Y/n) 

Rust requires the Microsoft C++ build tools for Visual Studio 2013 or later, but they don't seem to be installed.

Microsoft C++ build tools for Visual Studio 2013 かそれ以降が入っていないぞと言われました。
これが必要になるんですね。

Build Tools for Visual Studio 2019 のインストール

visualstudio.microsoft.com

上にもURLがありましたが、こちらからインストールが可能です。
Visual Studio 2019 のツール」→「Build Tools for Visual Studio 2019」
と探してみてください。

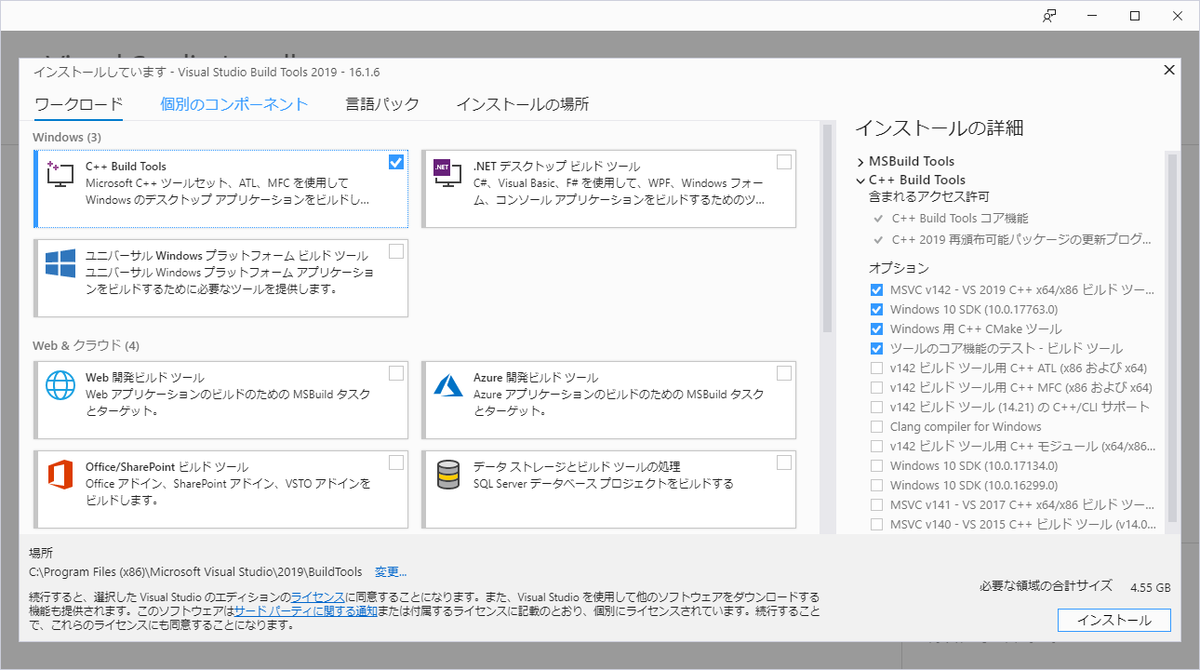
インストールを進めていくと、下記画面になります。 今回は左上の「C++ Build Tools」を選択すればOKです。

f:id:hrroct:20190816161104p:plain

Rustのインストール (続き)

先程の画面から、「Y」を入力して進めると、↓のような感じになります。

Welcome to Rust!

This will download and install the official compiler for the Rust programming
language, and its package manager, Cargo.

It will add the cargo, rustc, rustup and other commands to Cargo\'s bin
directory, located at:

  C:\Users\${USER}\.cargo\bin

This path will then be added to your PATH environment variable by modifying the
HKEY_CURRENT_USER/Environment/PATH registry key.

You can uninstall at any time with rustup self uninstall and these changes will
be reverted.

Current installation options:

   default host triple: x86_64-pc-windows-msvc
     default toolchain: stable
  modify PATH variable: yes

1) Proceed with installation (default)
2) Customize installation
3) Cancel installation
>1

デフォルト設定でよいので、1で進めます。

info: syncing channel updates for 'stable-x86_64-pc-windows-msvc'
info: latest update on 2019-07-04, rust version 1.36.0 (a53f9df32 2019-07-03)
info: downloading component 'rustc'
info: downloading component 'rust-std'
info: downloading component 'cargo'
info: downloading component 'rust-docs'
info: installing component 'rustc'
info: installing component 'rust-std'
info: installing component 'cargo'
info: installing component 'rust-docs'
info: default toolchain set to 'stable'

  stable installed - rustc 1.36.0 (a53f9df32 2019-07-03)


Rust is installed now. Great!

To get started you need Cargo's bin directory (%USERPROFILE%\.cargo\bin) in
your PATH environment variable. Future applications will automatically have the
correct environment, but you may need to restart your current shell.

Press the Enter key to continue.

これでいったん完了です。
exeファイルはこちらに格納されています。

$ ls -l /cygdrive/c/Users/${USER}/.cargo/bin/
合計 94512
-rwx------+ 12 ${USER} ${GROUPS} 8062381 726 22:40 cargo.exe
-rwx------+ 12 ${USER} ${GROUPS} 8062381 726 22:40 cargo-clippy.exe
-rwx------+ 12 ${USER} ${GROUPS} 8062381 726 22:40 cargo-fmt.exe
-rwx------+ 12 ${USER} ${GROUPS} 8062381 726 22:40 cargo-miri.exe
-rwx------+ 12 ${USER} ${GROUPS} 8062381 726 22:40 clippy-driver.exe
-rwx------+ 12 ${USER} ${GROUPS} 8062381 726 22:40 rls.exe
-rwx------+ 12 ${USER} ${GROUPS} 8062381 726 22:40 rustc.exe
-rwx------+ 12 ${USER} ${GROUPS} 8062381 726 22:40 rustdoc.exe
-rwx------+ 12 ${USER} ${GROUPS} 8062381 726 22:40 rustfmt.exe
-rwx------+ 12 ${USER} ${GROUPS} 8062381 726 22:40 rust-gdb.exe
-rwx------+ 12 ${USER} ${GROUPS} 8062381 726 22:40 rust-lldb.exe
-rwx------+ 12 ${USER} ${GROUPS} 8062381 726 22:40 rustup.exe

このままだとパスが通っていないので、シムリンクを/usr/local/binに作成して、コマンドを実行できるようにします。

$ ./cargo --version
cargo 1.36.0 (c4fcfb725 2019-05-15)
$ cd /usr/local/bin
$ ln -s /cygdrive/c/Users/${USER}/.cargo/bin/cargo.exe cargo
$ ln -s /cygdrive/c/Users/${USER}/.cargo/bin/rustc.exe rustc
$ ln -s /cygdrive/c/Users/${USER}/.cargo/bin/rustup.exe rustup
$
$ cargo --version
cargo 1.36.0 (c4fcfb725 2019-05-15)
$
$ rustc --version
rustc 1.36.0 (a53f9df32 2019-07-03)
$
$ rustup --version
rustup 1.18.3 (435397f48 2019-05-22)

これでインストール作業はおしまいです。

Hello, World!

doc.rust-jp.rs

こちらを見て進めていきます。
プロジェクト用のディレクトリを作成し、

$ mkdir ~/projects
$ cd ~/projects
$ mkdir hello_world
$ cd hello_world

ファイルを作成します。

vim main.rs

ファイルの中身はこれだけです。

fn main() {
    println!("Hello, world!");
}

コンパイルして…
ちなみにコンパイルするとアレコレファイルが出来上がります。

$ rustc main.rs
$ ls -l
total 1357
-rwxr-xr-x 1 ${USER} ${GROUPS}  139264 Jul 26 19:17 main.exe
-rwxr-xr-x 1 ${USER} ${GROUPS} 1249280 Jul 26 19:17 main.pdb
-rw-r--r-- 1 ${USER} ${GROUPS}      46 Jul 26 18:46 main.rs

最後に生成された実行ファイルを実行すると…できました。

$ ./main
Hello, world!

Hello, World! その2

Cargoという、一緒にインストールしたパッケージManagerを使います。
Hello, world! くらいでは恩恵は感じませんが、基本はこのCargo経由でコンパイルするのが普通のようです。

まずはディレクトリ構成を変更、実行ファイルも一旦削除します。

$ mkdir src
$ mv main.rs src/main.rs
$ rm main  # Windowsなら'del main.exe'になります

コンパイルするには、下記コマンドを実行します。
lsも実行してみましたが、勝手にファイルやディレクトリが生成されています、

$ cargo build
   Compiling hello_world v0.0.1 (C:\cygwin64\home\${USER}\work\rust\hello_world)
    Finished dev [unoptimized + debuginfo] target(s) in 0.50s
$ ls -l
total 1222
-rwxr-xr-x  1 ${USER} ${GROUPS}     143 Jul 26 18:35 Cargo.lock
-rw-r--r--  1 ${USER} ${GROUPS}     104 Jul 26 18:35 Cargo.toml
-rwxr-xr-x  1 ${USER} ${GROUPS} 1249280 Jul 26 18:17 main.pdb
drwxr-xr-x+ 1 ${USER} ${GROUPS}       0 Jul 26 18:34 src
drwxr-xr-x+ 1 ${USER} ${GROUPS}       0 Jul 26 18:35 target

buildコマンドに引数を付けない場合、debugモードでコンパイルされているようです。
実行するには下記のコマンドを叩きます。

$ ./target/debug/hello_world
Hello, world!

いちいち階層を辿らなくとも、cargoコマンドを使っても実行できます、

$ cargo run
    Finished dev [unoptimized + debuginfo] target(s) in 0.01s
     Running `target\debug\hello_world.exe`
Hello, world!

debugではなく、releaseモードでコンパイルする場合はこちら。

$ cargo build --release
   Compiling hello_world v0.0.1 (C:\cygwin64\home\${USER}\work\rust\hello_world)
    Finished release [optimized] target(s) in 0.25s
$ ./target/release/hello_world
Hello, world!

lsするとわかりますが、各ディレクトリに実行ファイルができていますね。
しかも容量が微妙に違います。debugモードの機能が仕組まれているんでしょうね。
(詳細は調べてません…)

$ ls -l ./target/{debug,release}/hello_world
-rwxr-xr-x 2 ${USER} ${GROUPS} 139776 Jul 26 18:35 ./target/debug/hello_world
-rwxr-xr-x 2 ${USER} ${GROUPS} 137216 Jul 26 18:38 ./target/release/hello_world

最後に

私は元々C言語系をやっていて、それからWebの世界に入りました。
そのせいかRustは懐かしさを覚えつつも、最近の言語である便利さも兼ね備えれていると感じました。

ぜひスクリプト言語がメインの方も、気分転換に他の言語を触ってみてはいかがでしょうか。 以上でした!